Not exactly what you were thinking. Wooooo hooooo. We got rain. Finally. So on the the Climate Change issue, or more specifically what was once called Global Warming that has now been downgraded to Climate change. Without a doubt, the climate changes. It just changed from rather dry to rather wet. Hands down there is no debating that the climate changes. :)
Now on to some better things. Now that its wet, my car port is not the most ideal place to work on my vehicle. I can't just sweep out a spot in my garage so I must do with what I have. I am however still moving forward with my 20w x 30l x12h shop. I just ordered the extra 10 ft length I need to make it a 30ft long shop. Once that arrives I will need to contract out for the foundation. I have the plans and they will be specific to my location so I can get the proper permits and that the foundation will be done correctly to support the new building. I will be powering it will totally off grid solar. Im thinking about 3kW size for the system. Should be easy to do.
I also just talked to the solar guys and they will be coming out to install another 3kW array on my car port. That will give me a total of 10kW for my home system. Should cover all my needs for the entire year and then some. With the extra 3kW off grid solar I will have more than enough for our needs.
Ives from Synkromotive is getting some interesting stuff done. Should see the firmware update today. I will post schematics of different things you can do with the Synkromotive when the firmware update is finalized and sent to me. I will have the update available to those who have a Synkromotive and want to do some cool things that they were not able to do before or were not aware was available because it was not put into the original manual.
Got 34 cells installed into the Bug last night. Had to clean the tops because the previous owner put duct tape on the positive terminals and after sitting for some time the glue stuck to the aluminum and I had to clean off that nasty sticky glue. Once done I scuffed the tops and installed the battery straps. I have the copper stacked leaf type of strap. No issue with me on these. So now I will go snug them up tight and will strap the whole pack together for now.
No, the pack is not bottom balanced but they are pretty close already. I will not be driving the vehicle yet as it needs a few items to be completed first. Yes, its a slow project. I have little time to actually do hands on with the project. Once the pack is done I will setup for some more charging and video of the setup.
Thats about it for today.
Pete :)
Wednesday, January 29, 2014
Monday, January 27, 2014
Synkromotive Firmware Update
Synkromotive will be getting a huge and solid Firmware Update. Once we get it we will put it through its paces and we will even try out the regen function. Since I have a neutral timed motor and inter poles my setup will be the most ideal for testing out the regen function. This is a much awaited update for the Synkromotive controller to date. We will need to do a writeup for regen and charging for both AC and DC. Looks like I will need more contactors for the regen setup.
Here are some possibilities for your setup. One of them should fit your needs.
Possible Installation Configurations:
Forward
Forward + Reverse
Forward + Re-gen
Forward + Charging
Forward + Fuel Gauge
Forward + Reverse + Re-gen
Forward + Re-gen + Fuel Gauge
Forward + Charging + Fuel Gauge
Forward + Re-gen + Reverse + Charging
Forward + Re-gen + Fuel Gauge + Charging
NOT Capable:
Forward + Reverse + Re-gen + Fuel Gauge + Charging
I will be having another video shortly. More DC charging. Will setup a bank of solar and charge directly from solar. Not fast but directly with solar.
Pete :)
I was thinking about this setup. Even when I take off the components from the ply backing the motor compartment will be quite cluttered and busy. My plan now is to take all the electronics and mount them on the other side of the firewall. It will be totally unseen but totally connected. The motor compartment will be hosed with black bed liner and then cover the open areas around the motor to close off the motor compartment and only allow the top half of the motor to show in the motor compartment. That will open up and make it so simple and clean to the look. No one will ever see the jumble of wires. Not sure where to put the charger plugs. I want this ride looking clean. I will also not have to replace my motor deck lid. It had louvers punched into the lid for cooling and looks but would allow rain and water in. Not that I will be driving this in wet weather. But if I get caught in a downpour I don't want my electronics getting wet.
Tuesday, January 21, 2014
Fast Charging Revisited
We are revisiting the Fast Charge abilities of the Synkromotive controller. I have had my project on hold for a long time but its time to restart. I took my Bug apart last year in order to sell the body. I took all my components apart except the Demo Board with the controller and components. I did however forget to write down the issues I had to go through to figure out the fast charge with the Synkromotive controller. It was actually a minor issue but an issue none the less that would render the setup non functional because of a couple simple errors on the diagrams. The first issue is to have the proper firmware. I have copies of them all so no issue there. If you want DC charging, I have it. If you want AC charging I have that. I also have Regen setup but still need a bit more information. It does work and yes it is for Series motors. The age old issue of arcing an advanced Series DC motor still exists. So you should have a neutral timed motor and if possible, one with inter-poles. Just like you find in the larger GE Series motors and the larger Kostov motors. I suspect that this function will be a bit less desired because it is not as elegant as the AC motor regen abilities. But I do suspect that the charging function of the controller will be very much one that will be desired. We now have 3 including myself that are totally interested in DC source charging through the controller. I am working with a couple others with the Synkromotive controllers and we will do a rewrite so those interested will have the ability to do DC charging. It really is easy. It was originally intended for those who were totally off grid and wanted to use Solar directly or from a bank of batteries to charge from. A lot of effort was put into this function. It is not open source. Now that the issues have be revisited again we have two more working charging Synkromotive controllers.
I wanted to charge from 240 but the way the controller works it is required to use 110 because 240 volts is higher than the controller can use. Its max is 192 volt nominal pack voltage. The setup requires a DC source that is lower than the discharged voltage of your pack. You must be sure that the DC source is not higher than the lowest voltage your pack will ever see. It uses an inductor in the system to boost the voltage to the desired voltage you set in the software. So I can charge from a high amperage low voltage DC source. Since I wanted to utilize my 240 I would need to find a way to step down the voltage to a level I can use for the controller to charge with. Mmmmmmm. What could I use. A bank of batteries? Yes. An old Lester type charger that step-downs the 110 voltage to a usable voltage for like a 96 volt system. I could use in that case an old 72 volt golf cart charger that charges at 30 amps. That would work but would be slow. So what to do. How about an old arc welder. Mmmm. Maybe it would work. Yes if you have the right one, it will work. I have one. It can take my 240 and step it down to any desired voltage I want. When you step down the voltage the amperage rises. This is what is needed for arc welding. So I take my welder and dial in a voltage that will give me as much as possible without going over the lowest possible voltage of my pack and then just plug it in. I will be doing a demo very shortly on this process. Last time I used a bank of 48 volt Solar Batteries. It works but limited. Since my home is solar powered I can claim my electric cars are all solar powered and solar charged.
So be on the watch for another video in a couple days.
Pete :)
Saturday, January 11, 2014
Quickie Porsche 914 update
Today I put in new headlights. No, not the cool LED lights. Not yet anyway. I also got the heater functioning. Now that all the little stuff except the parking brake switch and carpet are done I can now look forward to gathering all my EV components, all the while enjoying the car with the ICE until such time as I rip it out and install all the EV components. I will continue with the Bug build. I did however come up against a snag with the Bug. I closed the front trunk and it locked but I found out that the front release is a locking type and I don't have a key. Bummer. Now I gotta figure out how to get in without destroying any parts. Except of course the lock on the release. Then I will get a new locking release with a key. You know, keys really do help. :)
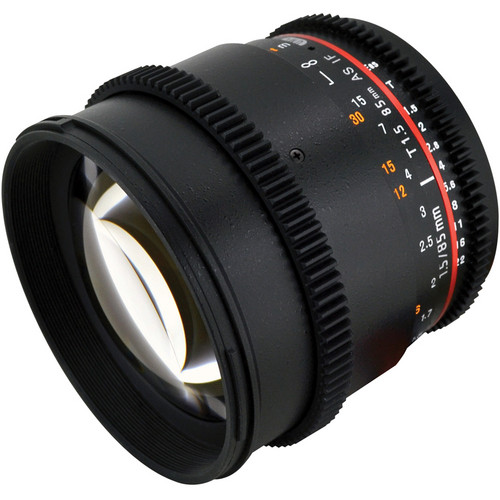
On the camera front, I have been playing with my new Sony A7R and now have some new lenses. One is a 24mm 70mm zoom from Sony for the A7 but it works equally well on the A7R. I also picked up a new Samyang 85mm Cine Lens. These are actually quite good but they are totally manual. So if you don't mind manual lenses then the price factor is just unbeatable. Excellent glass for the budget minded Videographer and Photographer. I can't use the 85mm in the office but it will be great for video clips of cars and outside interviews where I can setup a bit further away. I am looking into getting a 24 manual cine lens and or even a 35mm cine lens. Both of which I could use in the office. They are designed for full frame cameras but will also work with the crop sensor cameras if you don't mind that they would need to be set further away to get a good view. So on my Canon the 24mm would have the same field of view as a 38mm lens without the magnification. The 85mm would equal 136mm lens without the magnification. I have a 24mm manual lens but its not the best in low light but with the studio lights it works pretty good for in the room video. I usually have the f-stop at about 4 so the depth of field is not so narrow which makes for easier focusing. I have a stuffed hanging monkey I call my focus monkey so I set it up so it is hanging right were I would be sitting and then focus on that. Manual focus is good because it does not move but I have a narrow range of movement I can do so I must not move too much out of my area. I will try f-5 and 6 later to see how much extra room I have for moving about in front of the camera.
The gear looking things are for follow focus rigs and gear to move the armature as needed during video sessions.
Subscribe to:
Comments (Atom)